Announcement:

This is a Testing Annocement. I don't have Much to Say. This is a Place for a Short Product Annocement

Tuesday, 11 June 2013

Free Premium Blogger Template

Another Free Premium Blogger Template from Way2Blogging.org. I used this blogger template for Way2Blogging.org when it was on Blogger. and Now this blog on WordPress. So many of our readers requested the Way2Blogging’s Old blogger template. and Now it is here to Download for Free!!!. It was actually created on June 01, 2011 and I modified and tweaked today. Before i coded the template with Hard-coded. that means i edit the template and add menu links. Now i added the link-lists and page-lists widgets to easy customization.

LIVE DEMO

Way2Blogging : Free Premium Blogger Template
LIVE PREVIEW

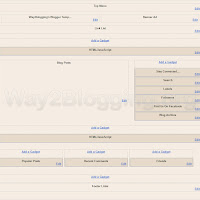
PAGE LAYOUT PREVIEW

Way2Blogging Blogger Template Page Layout Preview
Click Thumb to Enlarge

FEATURES

  • Nice and Elegant Template
  • Fixed Width
  • Adsense Optimized.
  • SEO Optimized
  • 3 Column Footer Widgets
  • 3 Navigation Menus
  • Header banner Ad
  • Page navigation Widget
  • Custom Social Sharing Widget
  • Related Post by Linkwithin
  • New Social Sharing Option
  • Do you like This Article Widget.
  • Supports Default and Threaded Comments
  • Cross Column Widget sections at top and bottom
  • Default Jump Breaks for Post excerpts
  • Breadcrumbs

DOWNLOAD WAY2BLOGGING’S BLOGGER TEMPLATE

This Template is Absolutely Free!!
If you want to download the Template, Leave a Comment in this Post with Valid and working Email Address. After Immediate Approving your Comment, You will receive a Mail with the template attached to it.
I respect your Privacy!
You don’t need to include the Email address in Comment Body. Just add the Email address to Mail field.

HOW TO UPLOAD THE BLOGGER TEMPLATE

OLD DASHBOARD

  1. Go to Blogger Dashboard > Design tab > Edit HTML tab
  2. Click on Download Full Template to backup your Old template for safety
  3. Click the Browse button and locate way2blogging’s blogger template
  4. Click on the Upload Button. And you are Done!

NEW DASHBOARD

  1. Go to Blogger Dashboard > Locate your Blog if you have more then one blog.
  2. Click on More Options Drop Down and choose Template
  3. Click on the Backup/Restore button on Top Right Corner
  4. Click on Download Full Template button to backup your Old template for safety
  5. Click the Browse button and locate way2blogging’s blogger template
  6. Click on the Upload Button. And you are Done!

CUSTOMIZATION

Basic Steps:This basic steps you need to follow for each customization.
  1. On New Blogger Dashboard Go to Template > Edit HTML Button
  2. Ignore the Warning and Click the Proceed button
  3. Check/Tick the Expand Widget Template checkbox

CUSTOMIZING ADSENSE ADS

ADSENSE BELOW POST TITLE

  1. Adsense Ad Dimensions: 336px X 280px
  2. Search for the tag <!-- Adsense Below Post Title -->
  3. Put your Adsense Code just after the it.
  4. PS: Encode the Adsense code before pasting into the Template using the HTML Encode and Decode Tool

ADSENSE AT POST END

  1. Adsense Ad Dimensions: 336px X 280px
  2. Search for the tag <!-- Adsense Post Bottom -->
  3. After this Tag you will find the Default Adsense Code, Replace it with your Adsense Code.
  4. PS: Encode the Adsense code before pasting into the Template using the HTML Encode and Decode Tool

CUSTOMIZING THE DO YOU LIKE THIS ARTICLE BOX

CUSTOMIZE SOCIAL ICONS

  1. Search for <!-- DoYouLike Social Links --> code.
  2. After the code, you will find the social links, Change the URLs of Rss, Twitter, Facebook and Stumbleupon links respectively.

CUSTOMIZE FEEDBURNER EMAIL FORM

  1. Search for <!-- Feedburner Email From --> code
  2. After the you will see the email form. In the form change the way2blogging feedburner Id in Two places.

LINKWITHIN RELATED POSTS

Grab the related post widget code from linkwithin.com and paste after <!-- Linkwithin Script --> comment.

ADDING STAY CONNECTED AND SEARCH WIDGET

I already given the code for this two widgets on this Blog.
Please visit the Post Titled Way2Blogging’s Social Subscription Widget for Blogger / Blogspot

SHARETHIS SCRIPT

This template uses the sharethis third-party social sharing option. You need to add the social sharethis script to your blog in order to work the social sharing.
It is free and you can get the sharethis code from sharethis.com
Put the sharethis code after <!-- Sharethis script Start --> code.
you can get further help from Comments.
Please leave your Comments and share this Template with your friends.
Thanks.
NOTE: Please do not re-share or Host this blogger template any where. !

Optimize Your Blog Post Titles for Better SEO

Optimize Your Blog Post Titles for Better SEO
The reason most of the blogger templates aren’t that SEO friendly because templates available in Blogger were designed long ago and haven’t been updated, probably since 2007, since then Google SEO algorithm has changed a lot and as being on blogger you don’t want to be left long away, to keep up with the competition making your Blogger template SEO friendly is very important and so this small SEO related article will help you to leave your competitors behind.
If you are also using a template from Blogger then you need to make some changes on it to fit your needs and also to fit the search engine needs. Normally search engine don’t focus on the markup importantly but it’s a good thing to change it to something user friendly.  What Blogger templates like ‘Simple’, Travel’ etc. have h1 tag as it’s Blog title, which is normal. But the Post title is not okay that all, it is in an h3 tag, for many reasons your blog might not being shown up in the search results and this is on of those reasons.
You won’t find any difficulties with a WordPress theme, as they are freshly published and reviewed by experts but templates in Blogger were made by expert but not freshly launched. Just as the search engines detects an anchor link because of it’s markup then why can’t they see what heading is being used for what area.

OPTIMIZE THE POST TITLE TO HEADING2 IN BLOGGER

Enough about it’s effect, let’s talk about how to make the changes applicable. These easy instruction will give you the easiest way to turn your post title to h2 from h3.
  1. First of all login to your Blogger Dashboard
  2. Go to the Template tab and click on Edit HTML, ignore the warning and proceed.
  3. Check mark the ‘Expand Widget Template’
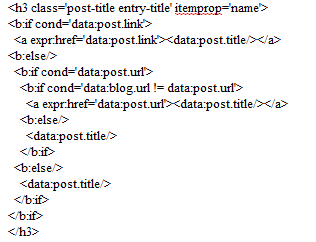
  4. Use CTRL+F and search for this line
    <h3 class='post-title entry-title' itemprop='name'>
  5. All you have to do is just change the <h3> to <h2>, change of only a number. But we aren’t done yet, remember there’s still an ending/closing tag. You have to change both starting <h3>and ending </h3> tag into the template. In the middle it’s all XML codes that works on the server to serve an HTML page.
    Changing the closing and starting h3 tagAfter you turn the starting h3 to h2, do remember to change the ending tag too or it will create difficulties while saving the template.
  6. You will find the tag two times. one is for Desktop Version Template and another is for Mobile version Template. I recommend you to change all h3 that marks as the post title to h2. Searching for <h3 will bring up the codes but as i already said, remember to change corresponding closing tag too.
Yeah that’s it ! It doesn’t only increase visibility and beauty of your blog in search results but also make your blog user friendly. Now stop using h3 for your post title, h3 is only good in the post body for heading. This was not a big change or addition for better SEO in your blog but remember it is how SEO works, there’s no easy and direct way to get to the top of search results, small and effective actions you take regarding your blog makes it a hit on SEO and search engines.
Don’t get worried if your blog don’t do too good in the search results, keep posting and that’s the most important aspect in getting to the top. And this blog is always free to read, check post related toBlogger SEO for some more amazing post and do subscribe for our coming posts.

5 Effective Ways to Build Organic Backlinks

5 Effective Ways to Build Organic Backlinks
Here are 5 Effective Ways to Built organic backlinks quickly. Apart from writing quality content and promoting it through social media, it’s necessary to have some quality backlinks to your blog. After the recent search algorithm changes by Google, many blogs are punished for several reasons. To stay safe and ahead of your competitors, it’s necessary to take some action and building organic backlinks will surely help.
This article is written after getting inspired from a video by Matt Cutts, the head of Google SPAM Team. He clearly mentioned some good points on how to build organic backlinks.

WHAT ARE ORGANIC BACKLINKS ?

There are thousands of ways to build links to your blog and none of them are equal to “Organic Backlinks”. In simple words, organic backlinks can be explained as the links that are naturally constructed, which usually happens when you focus on high quality and unique content.

HOW TO BUILT ORGANIC BACKLINKS ?

Here are 5+ sure fire tips that help to built organic backlinks to your blog.

1. CONTROVERSIES

Indulging in a Controversy will easily highlight things mostly if you are on the negative side. You need to follow-up regularly and have to be in touch with trending topics. Words have such a great power and believe me, with a single blog post you can grab the attention of the whole media. Play it safe or otherwise you may face some legal issues.

2. EXPERIMENTS

Experimenting on things will depend on your interest and passion to achieve something. Not everyone can do experiments as it needs lot of time and patience. So, if you are goot at something, then try to experiment on things and publish posts like How-to guides on your blog. This is how unique content can be built and organic backlinks will flow to your article, sometimes for years.

3. FREEBIES

Using a feebie to get subscribers and backlinks is an old yet powerful strategy. You cannot get backlinks immediately, but over time you can get some quality backlinks. This depends on the quality and type of freebie you are providing. If its a regular one, like a free PSD template or a free theme then there wont be much use. Try to work on creative things and give them away for free.

4. COMMUNITIES

Lets consider some blogs in the WordPress niche. There are quite popular and useful blogs on WordPress that help to make the most out of your WordPress blog. Whenever they write an article or list out some resources, links to the articles on other blogs will be included. This purely depends on the author of the article and so its necessary to establish some connections with fellow bloggers.

5. VIDEO BLOGGING

Many have the talent to create useful videos yet don’t try it. Consistent exposure can be gained through video blogging and if you need a sort of inspiration to start with, then you can check TheNewBoston (http://thenewboston.org/tutorials.php). That guy got good programming skills and he is sharing some knowledge through his videos. Make videos and your articles will be linked on many blogs.

BONUS TIP

Forum Participation also helps to get some backlinks. All you have to do is help others by providing some useful answers for questions in sections you have knowledge on. And important thing is don’t SPAM posts with single word answers, it may result in a ban.

OVER TO YOU

That’s it from my side and if I have missed any important one, let me know through comments. If you don’t agree with any of these methods or want some proofs on how they work, lets start the discussion now.

New AJAX Navigation Menu Widget for Blogger

After so long time almost two months, i am here with awesome new blogger widget. It is very hard to manage the works and blogs simultaneously. But still love to give the new blogger widgets and tips.
AJAX Navigation menu for blogger is very new widget created by Me in Blogger platform that uses Blogger JSON feed API and AJAX. This navigation menu is inspired from Mashable.com old site. I coded this widget some months ago, but there is no time for publishing this article. And now i recoded and improved this widget and added customizable features.

HOW IT WORKS ?

Well, this widget is works based on jQuery library and Blogger JSON feed API. Your blog must be for Public visitors. other wise the Blogger JSON Feed API won’t works.
The menu is works just like normal drop-down menu when javascript is disabled, And it will turns to AJAX powered drop-down menu when javascript is enabled.
AJAX Navigation Menu For Blogger Banner

HOW TO INSTALL THIS WIDGET?

  1. Go to Blogger Dashboard > Select the Blog > Go to Template page of the Blog
  2. Click Edit HTML button

THE CSS

Add the Following CSS Code before ]]></b:skin>
/* Menu Stylings */
.w2bmenu *{margin: 0;padding: 0;}
ul.w2bmenu {list-style: none;line-height: 1;overflow: visible !important;}
ul.w2bmenu:after{margin: 0;padding: 0;content: ' ';display: block;height: 0px;clear: both;}
ul.w2bmenu li{list-style: none;position:relative;float: left;margin: 0 !important;padding: 0 !important;}
ul.w2bmenu li a{margin: 0;padding: 12px 16px !important;font-family: 'Helvetica Neue', Arial, Helvetica, sans-serif !important;color: #6b6b6b !important;text-shadow: 0 1px 0 #fff;font-weight: 700 !important;text-transform: uppercase !important;font-size: 12px !important;display: block !important;border: 0 none !important;}
ul.w2bmenu li a:hover,ul.w2bmenu li a.hoverover{background: #f5f5f5 !important;}
ul.w2bmenu ul{position: absolute;display: none;top: 100%;border:1px solid #ccc;}
ul.w2bmenu li:hover > ul{display: block;}
ul.w2bmenu ul li{float: none;min-width: 160px;background:#f5f5f5;text-shadow: none;}
ul.w2bmenu ul li a{padding: 12px 14px;text-transform: none;font-weight: normal;}
ul.w2bmenu ul li a:hover,ul.w2bajaxmenu ul li a.hoverover{background: #fff !important;}
ul.w2bmenu ul ul{display: none;left: 100%;top: 0;}
/* AJAX Menu Stylings */
ul.w2bajaxmenu li div.submenu {display: none;position: absolute;width: 600px;z-index: 90;left: -1px;top: 100%;overflow: hidden;min-height: 150px;background: #fff;border:1px solid #cccccc;border-top: 0 none;}
ul.w2bajaxmenu li:hover div.submenu {display: block;}
ul.w2bajaxmenu ul ,ul.w2bajaxmenu ul li{display: block !important;border: 0 none !important;margin: 0 !important;padding:0 !important;}
ul.w2bajaxmenu ul li{background: none !important;float: none !important;}
ul.w2bajaxmenu ul.verticlemenu{position: absolute;width: 33%;left:0;top:0;bottom: 0;background: #f5f5f5;}
ul.w2bajaxmenu ul.postslist {position: relative;display: block;width:65%;float: right;margin: 8px 0 !important;background: none;}
ul.w2bajaxmenu ul.postslist li{display: block;overflow: hidden;border-bottom: 1px #eee solid;position: relative;min-height: 60px;padding: 8px 8px 8px 110px !important;}
ul.w2bajaxmenu ul.postslist li:last-child{border-bottom: none 0;}
ul.w2bajaxmenu ul.postslist li .imgCont{position: absolute;left: 0;top:8px;width: 100px;height: 60px;overflow: hidden;border:1px solid #dcdcdc;font-size: 0;line-height: 0;}
ul.w2bajaxmenu ul.postslist li .imgCont img{position: relative;top:-20px;padding: 0;width: 100px;height: 100px;display: block;}
ul.w2bajaxmenu ul.postslist li a{display: block;line-height: 1.4;padding: 0 !important;}
ul.w2bajaxmenu .loader{background:url('http://i.imgur.com/SeivG.gif') no-repeat scroll 0 0 transparent;width:22px;height:22px;position: absolute;top:50%;margin-top: -11px;right:5px;}
ul.w2bajaxmenu .menuArrow {border-bottom: 4px solid transparent;border-top: 4px solid transparent;border-left: 4px solid #999999;display: block;height: 0;margin-top: -4px;position: absolute;right: 11px;top: 50%;width: 0;}
#w2bajaxmenu {background: #ededed;background: -moz-linear-gradient(top, #ededed 0%, #e0e0e0 100%);background: -webkit-gradient(linear, left top, left bottom, color-stop(0%,#ededed), color-stop(100%,#e0e0e0));background: -webkit-linear-gradient(top, #ededed 0%,#e0e0e0 100%);background: -o-linear-gradient(top, #ededed 0%,#e0e0e0 100%);background: -ms-linear-gradient(top, #ededed 0%,#e0e0e0 100%);background: linear-gradient(to bottom, #ededed 0%,#e0e0e0 100%);filter: progid:DXImageTransform.Microsoft.gradient( startColorstr='#ededed', endColorstr='#e0e0e0',GradientType=0 );border: 1px solid #cccccc;}

THE JAVASCRIPT

If your Blog has jQuery plugin, then don’t add this plugin in your blog template,
Otherwise add the below line of code before  </head> tag
<script type="text/javascript" src="http://ajax.googleapis.com/ajax/libs/jquery/1.8.2/jquery.min.js"></script>
Add the following Javascript code before  </head> tag
<script type="text/javascript" src="http://widgets.way2blogging.org/blogger-widgets/ajaxbloggermenu.min.js"></script>
<script type="text/javascript">
jQuery(document).ready(function($) {
	$('#w2bajaxmenu').ajaxBloggerMenu({
		numPosts : 4, // Number of Posts to show
		defaultImg : 'http://url-to-image.com/default-image.jpeg' // Default thumbnail Image
	});
});
</script>

THE HTML

In this section you should be carefully add the HTML, otherwise it won’t works.
The AJAX Menu accepts three types of urls. You must use this urls only in the menu. They are Label,Search Query and Label w/ Search Query.
Label URLhttp://yourblogdomain.blogspot.com/search/label/LABELNAME
Search Queryhttp://yourblogdomain.blogspot.com/search?q=SEARCHQUERY
Label w/ Search Queryhttp://yourblogdomain.blogspot.com/search/label/LABELNAME?q=SEARCHQUERY
Note:- Search Query must be Url encoded. You can use this tool to encode your search query.
Use this MENU Example code and add it in HTML/JavaScript gadget.
<ul id="w2bajaxmenu" class="w2bmenu">
	<li>
		<a href="#">Home</a>
	</li>
	<li>
		<a href="#">Example 1</a>
		<ul>
			<li><a href="http://yourblogdomain.blogspot.com/search/label/AdSense">Sample Label</a></li>
			<li><a href="http://yourblogdomain.blogspot.com/search/label/Gadgets?q=harish">Label w/ Search</a></li>
			<li><a href="http://yourblogdomain.blogspot.com/search?q=way2blogging">Search Query</a></li>
			<li><a href="http://yourblogdomain.blogspot.com/search?q=This+is+long+query+you+do+not+get+any+results,+so+try+others">Unknown Search</a>
		</ul>
	</li>
	<li>
		<a href="#">Example 2</a>
		<ul>
			<li><a href="http://yourblogdomain.blogspot.com/search/label/Design">Design</a></li>
			<li><a href="http://yourblogdomain.blogspot.com/search/label/Facebook?q=Like+Button">Facebook</a></li>
			<li><a href="http://yourblogdomain.blogspot.com/search/label/Templates">Templates</a></li>
			<li><a href="http://yourblogdomain.blogspot.com/search?q=Guest+Posts">Guest Posts</a></li>
		</ul>
	</li>
	<li><a href="http://yourblogdomain.blogspot.com">Normal Link</a></li>
</ul>

FINAL WORDS!

I hope you enjoyed with this widget. I am really sorry for not posting new gadgets and templates regularly. I hope i will continue release new templates, widgets and tips. :)
Suggest new features, your feedback and your thoughts on this widget by leaving a comment and don’t forget to share this widget. and…………. Advanced HAPPY NEW YEAR! :D

Copyright @ 2013 All Tutorials and Information . Designed by Templateism | Love for The Globe Press